


Tuesday, August 13, 2013

Tutorial using the Hospital Stay scrap kit and posers by FwTags Creations
Supplies Needed
Paint Shop Pro - I am using X5, but any should do
The Hospital Stay scrap kit by FwTags Creations, which can be purchased at Berry Applicious HERE
Any color or gradient and font of your choosing
Okay, let's begin. The first thing you will need to do, is to start a new image in Paint Shop Pro (PSP for short). To do this, look at the top left corner, and click on FILE>NEW> a pop up will open...set width and height to 600, make background transparent Click okay, and you now have a blank size base for your tag, already sized and ready to go.
***(NOTE: there is a layers menu on the right side of your screen..if u do not see it then look up top and click VIEW>PALETTES>LAYERS and it will open up...u use this layer to bring things to the front..say for example u put a shoe on the tag but it went behind a bucket and u want it in front of the bucket...while holding the left click button on your mouse or touch pad down, you would slide the shoe to the layer the bucket is on..it would now be in the front...use this anytime u want to bring something to the forefront.)***
Okay let's get started! :)
Let's build this tag from the bottom up. First, find and open the paper #9 and copy and paste it to the new image..size it to fit. Next, find and open the El #45 medicine cabinet and reduce the size by 55% and center it on the tag. Next, find and open El #39 the hospital bed and reduce the size by 60%, and center it on the tag in front of the cabinet, with the top part of the cabinet showing behind the bed. Now find and open El #3 the girl patient and reduce her by 75% and place her on the left side of the bed, near the top of the bed. Now find and open El#5 the doctor and reduce him by 75% and place him to the right and slightly down from the patient.
Next, find and open the El# 11 the iv and reduce it by 85% and place it on the left side of the patient. Now find and open the El# 43 the wheelchair, and reduce it by 85% and place it on the right side, behind the bed. Now find and open the El# 1 the hospital sign and reduce it by 80% and place it centered, at the top of the tag. Now find and open El# 30 the first aid kit and reduce it by 95% and place it on the left side of the top of the cabinet. Now find and open El# 16 bottle of pills and reduce it by 95% and place it on the top of the cabinet on the right side.
Now find and open the El 35 the thermometer and reduce it by 95% and place it on the top of the cabinet. Next, find and open the El# 25 the syringe and reduce it by 97% and place it in the doctor's hand. Now find and open the El# 9 the doctor's badge and reduce it by 95% and place it on the bottom left of the doctor's coat. Now find and open El# 56 the bandage and reduce it by 95% and place it on top of the cabinet on the right side of the first aid kit. Next, find and open the El#57 the hand sanitizer and reduce it by 95% and place it on the far right side top of the cabinet.
Now find and open El# 26 the black stethoscope and reduce it by 90% and place it on the bed. Next, find and open El# 23 the red bow and place in the top left corner, reduce by 80% and then duplicate it and flip it horizontally....repeat on top right side. Now find and open El# 54 the paper towels and reduce it by 95% and place it on top of the cabinet, to the left of the hand sanitizer. Now find and open the El# 38 the open pills and reduce it by 95% and place centered on the bow at the top left...duplicate and flip it horizontally and place it on the top left center bow. Next, find and open the El# 44 the bracelet and reduce it by 95% and place it angled o the cabinet, by the bandage, and use the side layers menu and slide the thermometer to the forefront.
Now, add 3d effects drop shadow on the doc, the patient, the iv, the bed, the wheelchair, and the open pill bottles, to add depth and dimension. :)
You did it! You now have finished this tag. You will need to add copy wright info to your tag, as it is the law. Finally, add a name in any font and color of your choosing.
I hope you enjoyed this tutorial. If you did, please follow my blog and pass it along to others. If you make a tag using this tutorial, please send it to meat robynebutts@gmail.com, so I can place it on my blog.
Hugs and blessings,
Robyne
Matching timeline cover created using the Hospital Stay scrap kit by FwTags Creations

Preview of the awesome Hospital Stay kit by FwTags Creations!

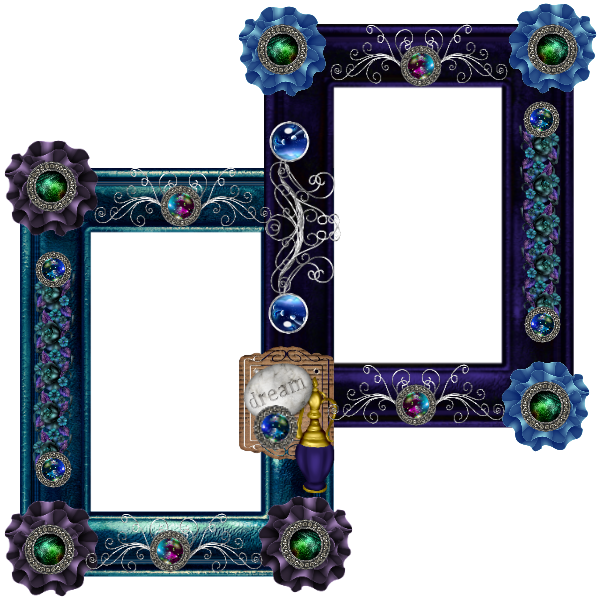
Preview of the freebie cluster frame I created using the Hospital Stay scrap kit by FwTags Creations!

FREEBIE cluster frame! You can download this frame by simply right-clicking on the image below, and then saving it to your computer. Please do NOT claim as your own work; either link back here to my blog, or link to the shop link where this kit can be purchased...ty!

Friday, August 9, 2013

Tutorial using the Twilight Fantasy scrap kit by Babycakes Scraps, and featuring the Black Angel tube by Alex_Prihodko
Supplies Needed
Paint Shop Pro - I am using X5, but any should do
The Twilight Fantasy scrap kit by Baby Cakes Scraps, which can be purchased at Bella Zingaro HERE
The Black Angel tube by Alex_Prihodko, which is available for purchase at Pics for Design HERE
Any color or gradient and font of your choosing
Okay, let's begin. The first thing you will need to do, is to start a new image in Paint Shop Pro (PSP for short). To do this, look at the top left corner, and click on FILE>NEW> a pop up will open...set width and height to 600, make background transparent, and make sure the transparent box is checked. Click okay, and you now have a blank size base for your tag, already sized and ready to go.
***(NOTE: there is a layers menu on the right side of your screen..if u do not see it then look up top and click VIEW>PALETTES>LAYERS and it will open up...u use this layer to bring things to the front..say for example u put a shoe on the tag but it went behind a bucket and u want it in front of the bucket...while holding the left click button on your mouse or touch pad down, you would slide the shoe to the layer the bucket is on..it would now be in the front...use this anytime u want to bring something to the forefront.)***
We will not be using a background paper for this tag, as I wanted parts to be transparent for a cooler effect. First things first, find and open the Black Angel tube. Hide all layers except the violet boots and the wings...merge those visible layers...now copy and paste her to the tag. Reduce her size by about 65% and place her centered, but to the right side. Now find and open the EL #36 doodle with the stone and reduce the size by 35% and place it centered at the bottom of the tag. Now find and open the El#35, and place it on the left side. use the side layers menu and slide the tube to the forefront.
Now find and open the El #53 corner flowers and reduce it by 80% and place in the top left corner...duplicate and flip it horizontally and place in the top right corner. Now find and open theEl #25 button and reduce it by 90% and place one centered in each of the top corner flowers swags. now find and open the El #30 cloud and reduce it by 25% and place it above the tube, centered, and use the layers menu and slide the swirls back to the forefront. Now find and open the El #7 and reduce it by 75% and place on the top right...duplicate and flip it horizontally and place on the top left . Use the side layers menu and slide them all the way to the bottom.
Now find and open El# 15 the flower trim and reduce it by 90%. Keep duplicating and moving it until you have gone all the way across the bottom of the tag. Duplicate and flip it vertically and keep moving across the entire top of the tag...slide the corner flowers and buttons to the forefront. Next, find and open El#43 the beige tag and reduce it by 70% and place it on the left side, under her wing. Now find and open the El# 31 the genie bottle and reduce it by 70% and place it on the right bottom of the tag.
Next, find and open the El #10 dream rock and reduce it by 80%, and center it between the head and the right wing. Next, find and open the El #51 and reduce it by 85% and place the mirror on the top right of the beige tag. Next, find and open El 326 the button and reduce it by 90% and place it on the bottom left of the tag. Now find and open El #25 button and reduce it 95% and place it over the stone in the bottom metal swirl. Lastly, find and open El #13 and reduce it by 75% and place on the top left, then duplicate it and flip it horizontally and place on the top right, and slide it down on the layers menu.
You did it! You now have finished this tag. You will need to add copy wright info to your tag, as it is the law. Finally, add a name in any font and color of your choosing.
I hope you enjoyed this tutorial. If you did, please follow my blog and pass it along to others. If you make a tag using this tutorial, please send it to meat robynebutts@gmail.com, so I can place it on my blog.
Hugs and blessings,
Robyne
Matching timeline cover I created using the Twilight Fantasy scrap kit by Baby Cakes Scraps, and the Black Angel tube by Alex_Prihodko

Preview of the awesome Twilight Fantasy scrap kit by Babycakes Scraps!

Preview of the freebie cluster frame that I created using the Twilight Fantasy scrap kit by Babycakes Scraps.

FREEBIE cluster frame! You can download this frame by simply right-clicking on the image below, and saving it to your computer. (It is in PNG format). Please do not claim as your own work; either link back here to my blog, or to the shop link where this kit can be purchased...thank you!
Thursday, August 8, 2013

Tutorial using the Hang Em Out Ta Dry scrap kit by BLT Dezignz
Supplies Needed
Paint Shop Pro - I am using X5, but any should do
The Hand Em out ta Dry by BLT Dezignz, which can be purchased at Wilma4Ever HERE
The Ashley tube by Misticheskaya, which is available for purchase at Pics for Design HERE
Any color or gradient and font of your choosing
Okay, let's begin. The first thing you will need to do, is to start a new image in Paint Shop Pro (PSP for short). To do this, look at the top left corner, and click on FILE>NEW> a pop up will open...set width and height to 600, make background white, and make sure the transparent box is not checked. Click okay, and you now have a blank size base for your tag, already sized and ready to go.
***(NOTE: there is a layers menu on the right side of your screen..if u do not see it then look up top and click VIEW>PALETTES>LAYERS and it will open up...u use this layer to bring things to the front..say for example u put a shoe on the tag but it went behind a bucket and u want it in front of the bucket...while holding the left click button on your mouse or touch pad down, you would slide the shoe to the layer the bucket is on..it would now be in the front...use this anytime u want to bring something to the forefront.)***
Now, let's add a nice paper to add some color to your tag. To do this, click on FILE>OPEN> find paper #1 and open it, then click on the pick tool on the tool menu on the left (it looks like an arrow)..a white dotted line will surround the paper, now click EDIT>COPY> find the image 1 tab at the top and click on it...you will do this every time to paste new items as you want to keep building on Image 1 (this is your tag), now click EDIT>PASTE AS NEW LAYER. Decrease the size to fit. Next, find and open the Ashley tube and pick the green layer, merge the visible layers and then copy and paste her to the tag. Reduce her size by 45$ and center her on the tag. Next, find and open the clothesline and reduce it size by 45%. Center it on the tag, and using the side layers menu, slide the tube back to the forefront.
Now find and open the clothes and reduce it by 60%. Place it angled just so on the clothesline, behind the tube. Now find and open the clouds and reduce it by 85%. Place it on the very top left and duplicate it 6 times. Duplicate again and flip it horizontally and Place it on the top right, and duplicate it 6 times. Now find and open the swirl and reduce it by 40% and place it on the right side; duplicate it and flip it horizontally and place it on the left; again use the side layers menu and slide the tube back to the forefront.
Now find and open the grass and reduce it by 75% and place it on the bottom left of the pole...duplicate, flip it horizontally and move over a tiny bit. Repeat this process on the other side of the tag. now find and open the b ow #1 and reduce it by 80% and place it in the top left corner angled...duplicate it and flip it horizontally...repeat on the top right corner. Now find and open flower # 5 and reduce it by 85% and place one in the center of each of the top corner bows. next, fin d and open the flower #6 and reduce it by 90% and place it in the center of both top corner flowers.
Next, find and open the laundry pail and reduce it by 80 and place it on the bottom right. use the side layers menu and slide it behind the tube and the grass. Now find and open the dress form and reduce it by 80% and place it on the bottom left, and slide it to the forefront. Next, find and open the fence and reduce it by 70% and place it towards the bottom of the tag, and using the side layers menu, slide it to the back. Now find and open the stitched sequins. Leave the size as is, and place it along all 4 sides of the tag. now find and open the flower #2 and place at the bottom of the grass..duplicate and flip it horizontally...repeat on the other side of the tag.
Now find and open flower #8 and reduce it by 80% and place it on the left pole of the clothesline...slide the stem behind the flowers...repeat on other side, with the flower going the opposite direction. Now find and open the hang em scatter and reduce it by 85%. Flip it horizontally...place at top left..duplicate and move it down a bit...now flip horizontally and place at top right..duplicate and move it slightly down. Now find and open the cat and reduce it by 85% and place it on the bottom left, in the forefront. Lastly, find and open the butterfly and reduce it by 90% and place angled on the right pole...duplicate and flip it horizontally and place on the left pole.
You did it! You now have finished this tag. You will need to add copy wright info to your tag, as it is the law. Finally, add a name in any font and color of your choosing.
I hope you enjoyed this tutorial. If you did, please follow my blog and pass it along to others. If you make a tag using this tutorial, please send it to meat robynebutts@gmail.com, so I can place it on my blog.
Hugs and blessings,
Robyne
Matching timeline cover that I created using the Hang Em out Ta Dry scrap kit by BLT Dezignz, which can be purchased at Wilma4Ever HERE and featuring the Ashley tube by Misticheskaya at Pics for Design HERE

Preview of the sweet Hang Em out Ta Dry scrap kit by BLT DeZignZ!

Preview of the freebie cluster frame I created using the Hang Em Out Ta Dry scrap kit by BLT DeZignZ!

FREEBIE cluster frame! You can download this frame by simply right-clicking on the image below, and then saving it to your computer. (It is in PNG format). Please do not claim this as your own work' either link back here, or link to the shop where this kit can be purchased...ty!

Wednesday, August 7, 2013

Tutorial using the Fall Dreams scrap kit by Jenny's Designz, and featuring the Little Wish tube by Arthur Crowe
Supplies Needed
Paint Shop Pro - I am using X5, but any should do
The Fall Dreams scrap kit by Jenny's Designz, which can be purchased at Sweet Pin-Ups HERE
The Little Wish tube by Arthur Crowe, which can be purchased at the Arthur Crowe Factory HERE
Any color or gradient and font of your choosing
Okay, let's begin. The first thing you will need to do, is to start a new image in Paint Shop Pro (PSP for short). To do this, look at the top left corner, and click on FILE>NEW> a pop up will open...set width and height to 600, make background transparent, and make sure the transparent box is checked. Click okay, and you now have a blank size base for your tag, already sized and ready to go.
***(NOTE: there is a layers menu on the right side of your screen..if u do not see it then look up top and click VIEW>PALETTES>LAYERS and it will open up...u use this layer to bring things to the front..say for example u put a shoe on the tag but it went behind a bucket and u want it in front of the bucket...while holding the left click button on your mouse or touch pad down, you would slide the shoe to the layer the bucket is on..it would now be in the front...use this anytime u want to bring something to the forefront.)***
Alrighty, let's get started building this tag.We will not be adding a mask or a paper to this tag, so we have some transparent areas. First things first, find and open the full-view of the Little Wish tube: look on the side layers menu and hide the sigs, background, tattoos, and piercings..merge the visible..then copy and paste it to your tag. Next, find and open the bridge, and reduce it by 35% and center it towards the bottom of the tag; use the side layers menu and slide the tube back to the forefront. Now find and open the lamp and reduce it by 15%. Place it on the right side and then duplicate it and flip it horizontally and place this one on the left side.
Now find and open the bush and place at the bottom of the right lamp..size down by 80%. Duplicate the bush..duplicate again and flip it horizontally and duplicate one more time. Repeat this process at the bottom of the left lamp. Now repeat the process on both sides on the insides of the bushes we just placed at the bottom of the lamps. Next, find and open the element #4 and leave the size as is...duplicate it and flip it horizontally and place at the top center of the tube. Slide the tube back to the forefront. Now find and open the doodle and reduce it by 85% and place on the left outside of the lamp...duplicate..duplicate again and flip horizontally, and duplicate one more time. Repeat this process on the outer side of the right side lamp.
Now find and open the leaf butterfly and reduce it by 90% and place on the bottom left bush at the bottom of the lamp pole...duplicate and move over to the next bush...now duplicate and flip it horizontally and move to the next bush on the right side...duplicate one more time and place on bush at bottom of the right side lamp post. Now find and open the flower #5 and reduce it by 80% and place it on the right side where the bench meets the pole, duplicate it and flip it horizontally to make it fuller/ repeat on the left side. Next find and open the flower # 2 and reduce it by 80% and place underneath the flower #5 and out close to the edge. repeat on the left side. Now find and open the flower # 3 and reduce it 90% and place it on the right side beside flower #2. Repeat on the left side.
Now find and open the acorns and reduce them by 95% and place it on the bottom left in the open space between bushes...duplicate and flip it horizontally and ad on right side. Now find and open the kitty and reduce her by 85% and place her on the bridge on the right side of the tube. Now find and open the bird and reduce it by 75% and place on the top left of the bridge. Now find and open the butterflies 2 and reduce them by ab out 35% and place it on the top right and the duplicate it, flip it horizontally and add it to top left.
Now find and open the snail and reduce it by 95% and place it on the right top of the bridge, towards the left. Now find and open the bird #2 and reduce it by 85% and place it to the right of the snail, slightly angled. Now find and open the hay and increase the size by 40% and place it behind the bridge; use the side layers menu and slide it all the way to the back. ow find and open the clock and increase it 20% and center it behind the top 1/2 of the tube. Lastly, find and open the butterfly 1 and reduce it by 95% and then place it on the top left by the pole...duplicate and flip it horizontally and place on the top by the right pole.
You did it! You now have finished this tag. You will need to add copy wright info to your tag, as it is the law. Finally, add a name in any font and color of your choosing.
I hope you enjoyed this tutorial. If you did, please follow my blog and pass it along to others. If you make a tag using this tutorial, please send it to meat robynebutts@gmail.com, so I can place it on my blog.
Hugs and blessings,
Robyne
Matching timeline cover I created using the Fall Dreams scrap kit by Jenny's Designz, which can be purchased at Sweet Pinup HERE and the Little Wish tube by Arthur Crowe, which can be purchased at Arthur Crowe's Factory HERE

Preview of the gorgeous Fall dreams kit by Jenny's Designz!

Preview of the freebie cluster frame I created using the Fall Dreams kit by Jenny's Designz!

FREEBIE cluster frame! You can download this frame by simply right-clicking on the image below, and saving it to your computer. Please do NOT claim as your own work; either link back here to my blog, or to the shop link where this kit can be purchased...thank you!

Monday, August 5, 2013

Tutorial using the Blooms scrap kit by Bookworm Dezines, and featuring the Crazy tube by Arthur Crowe
Supplies Needed
Paint Shop Pro - I am using X5, but any should do
The Blooms scrap kit by Bookworm Dezines, which can be purchased at Scrap Candy HERE
The Crazy tube by Arthur Crowe, which can be purchased at Arthur Crowe's Factory HERE
Any color or gradient and font of your choosing
Okay, let's begin. The first thing you will need to do, is to start a new image in Paint Shop Pro (PSP for short). To do this, look at the top left corner, and click on FILE>NEW> a pop up will open...set width and height to 600, make background transparent, and make sure the transparent box is checked. Click okay, and you now have a blank size base for your tag, already sized and ready to go.
***(NOTE: there is a layers menu on the right side of your screen..if u do not see it then look up top and click VIEW>PALETTES>LAYERS and it will open up...u use this layer to bring things to the front..say for example u put a shoe on the tag but it went behind a bucket and u want it in front of the bucket...while holding the left click button on your mouse or touch pad down, you would slide the shoe to the layer the bucket is on..it would now be in the front...use this anytime u want to bring something to the forefront.)***
We will not be using a paper or a mask for this tag. First thing, let's add our tube to our tag.Find and open the full-view of the Crazy tube and reduce her by 45%, and then center her on the tag. Next, find and open the El #11 and reduce it by 20%, and place it in the center of the tag. Slide the tube back to the forefront, using the side layers menu. Now find and open the El #33 clock and leave the size as is, and center it on the tag, behind the tube.
Now find and open the El #29 flower and reduce it by 85% and place it on the bottom right corner...duplicate it, flip it horizontally, and place on the bottom left corner. Now find and open El #34 and reduce it by 85%, place one on each of the top corners, and duplicate and flip horizontally, to make them thicker. Find and open El #21 and reduce it by 70% and place it on the right side angled, duplicate and flip it horizontally and place on the other side.
Now find and open the El#27 and reduce it by 85% and place on the bottom left behind the pink flower...duplicate, flip it horizontally and place on the right side. Now find and open El#32 the leave stem, and reduce it by 70% and place it on the left side...duplicate and flip it horizontally. Repeat on the other side...slide them all to the background, behind the gen swirls. Next, find and open the El#12 orange beads and center it, and using the side layers menu, slide them al the way to the bottom.
Now find and open the El #11 and duplicate it and flip it horizontally...slide it to the top. Now find and open El#4 and reduce it by 90% and place it on the bottom, above the flowers. Next, find and open the El#16 bows and reduce it by 90% and place One on the clock frame right above the ferns, on both sides. Lastly, find and open the El # 22 the pink sparkles...keep duplicating them and flipping them horizontally and vertically, until you are happy with the appearance!
You did it! You now have finished this tag. You will need to add copy wright info to your tag, as it is the law. Finally, add a name in any font and color of your choosing.
I hope you enjoyed this tutorial. If you did, please follow my blog and pass it along to others. If you make a tag using this tutorial, please send it to meat robynebutts@gmail.com, so I can place it on my blog.
Hugs and blessings,
Robyne
Matching timeline cover I created using the Blooms scrap kit Bookworm Dezines, which can be purchased HERE and the Crazy tube by Arthur Crowe, which can be purchased HERE

Preview of the beautiful Blooms kit by Bookworm Dezines!

Preview of the FREEBIE cluster frame I created using the Bookworm Dezines scrap kit!

FREEBIE cluster frame! You can download this frame by simply right-clicking on the image below, and saving it to your computer. (It is in PNG Format). Please do NOT claim as your own work; either link back here to my blog, or link to the shop link where this kit can be purchased....thank you!


Tutorial using the Circus Wonders scrap kit by Patty B Scraps
Supplies Needed
Paint Shop Pro - I am using X5, but any should do
The Circus Wonders scrap kit by Patty B Scraps, which is available for purchase at Wilma4Ever HERE
Any color or gradient and font of your choosing
Okay, let's begin. The first thing you will need to do, is to start a new image in Paint Shop Pro (PSP for short). To do this, look at the top left corner, and click on FILE>NEW> a pop up will open...set width and height to 600, make background white, and make sure the transparent box is not checked. Click okay, and you now have a blank size base for your tag, already sized and ready to go.
***(NOTE: there is a layers menu on the right side of your screen..if u do not see it then look up top and click VIEW>PALETTES>LAYERS and it will open up...u use this layer to bring things to the front..say for example u put a shoe on the tag but it went behind a bucket and u want it in front of the bucket...while holding the left click button on your mouse or touch pad down, you would slide the shoe to the layer the bucket is on..it would now be in the front...use this anytime u want to bring something to the forefront.)***
We will not be using a mask, but we will use a background paper for this tag. To begin, find and open the paper #1. Reduce the size by about 70%, until it fits the tag. next, find and open the frame #1 and reduce the size by 70% and center it on the tag (this is like an entrance to a circus tent. Now find and open the circus performer #2 the boy and place him on the right side of the entrance, and reduce him by 85%. Find and open the performer #1 the girl and place he ron the left side of the entrance, reducing her size by 80%.
Now find and open the panda and reduce it by 70% and place it at the top, between the performers. Now find and open the bow #2 and place them in the 2 top corners, making sure they are going opposite directions. Next, find and open the flower #1 and reduce it by 85% and place it in the center of each of the 2 top corner bows. Now find and open the balloons and reduce it by 80% and center them in the tent frame.
Now find and open the ribbon #3 and reduce it by 80% and place it across the top and the bottom; use the side layers menu and slide the bows and flowers back to the forefront. Now find and open the ribbon #1 and reduce it by 90% and place it down the sides of the tag. Now find and open the word art and decrease it by 80% and place it at the top above the performers. Now find and open the tokens and reduce the size by 85% and place on the bottom left, duplicate and flip it horizontally and place on the bottom right. Lastly, find and open the banner and reduce it by 90% and place it across the top of the tag.
You did it! You now have finished this tag. You will need to add copy wright info to your tag, as it is the law. Finally, add a name in any font and color of your choosing.
I hope you enjoyed this tutorial. If you did, please follow my blog and pass it along to others. If you make a tag using this tutorial, please send it to meat robynebutts@gmail.com, so I can place it on my blog.
Hugs and blessings,
Robyne
Here is the matching timeline cover I created using the Circus Wonders scrap kit by Patty B Scraps, which is available for purchase at Wilma 4 Ever HERE

Preview of the fun Circus Wonders kit by Patty B Scraps!

Preview of the FREEBIE cluster frame that I created with this awesome circus scrap kit!

FREEBIE cluster frame! You can download this frame by simply right-clicking on the image below, and then saving it to your computer. (It is in PNG format). Please do NOT claim as your own work; either link back here to my blog, or to the link where the kit can be purchased.

Subscribe to:
Posts
(Atom)
Licensed Reseller

Beautiful Blog Award

Designer That Inspires Award

Blog I Love Award

Rawk My Socks Award

CU License Tagging Obsessions

Niqui Designs CU License

CU License Scraps Dimensions

DzinesByMelz CU License

Anorie's CU License

CU License Lacarolita's Designz

CU License Tezza'a Dezignz

CU License Scrap and Tubes

Cakie Pot Pie CU License

Denise Creationz CU License

EW CU License

FDM CU License

More shops I CT for & Love


 "
"