


Showing posts with label Felice Originals. Show all posts
Showing posts with label Felice Originals. Show all posts
Tuesday, March 11, 2014

Preview of the lovely Kiss Me I'm Irish tube by Felice Originals

Preview of the wonderful Kiss My Irish scrap kit by Michelle's Myths


CT PTU tutorial for the Kiss My Irish scrap kit by Michelle's Myths, and the Kiss Me I'm Irish tube by Felice Originals
Materials Needed
The Kiss My Irish scrap kit by Michelle's Myths, which can be purchased at PFD HERE
The Kiss Me I'm Irish tube by Felice Originals, which can be purchased at Sweet Pinups HERE
Mask AR315CMCMask84 which can be downloaded from their blog HERE
PSP - I am using X5, but any should do
***This tutorial assumes you have a working knowledge of PSP***
Okay, let's begin. The first thing you want to do is create our mask layers. Open whatever mask you choose to use; I have chosen a mask by The Creative Misfits. Okay, in Paint Shop Pro (PSP) click FILE>OPEN>and open the mask (AR315CMCMask147), or the mask you have chosen, then start a new image FILE>NEW>700x700 and transparent needs to be checked. Choose color or gradient on the right side layers menu; I chose to use a kit paper instead...I used paper 3....copy and paste the paper to the new image. Now go to the top layers menu and click NEW MASK LAYER> from image...a pop up opens..click on the title of the mask you chose in the drop down menu. Now go back to the side layers menu and click on the square that has the layers combined...right click it then click merge..the merge group..and voila..you have a mask layer now! :) Just copy and paste it to the tag, making sure it is centered, and increase size as needed.
***(NOTE: there is a layers menu on the right side of your screen..if u do not see it then look up top and click VIEW>PALETTES>LAYERS and it will open up...u use this layer to bring things to the front..say for example u put a shoe on the tag but it went behind a bucket and u want it in front of the bucket...while holding the left click button on your mouse or touch pad down, you would slide the shoe to the layer the bucket is on..it would now be in the front...use this anytime u want to bring something to the forefront.)***
Next, find and open the el 45, and reduce it by 70%, and place it on the bottom right...duplicate it and flip it horizontally, and place on the bottom right....duplicate and put in the center of the other two, and up a bit. Next, find and open the Kiss Me I'm Irish tube...make sure she has an all the green layers...copy and paste her to the tag...reduce her by 35% and center her on the bottom. Next, find and open the el 64, and leaving the size as is, place it on the bottom right...duplicate it and flip it horizontally and place on the bottom left.
Next, find and open el 42, and reduce it by 85%, and place it on the left side, behind the rocks. Next, find and open the el 43, and reduce it by 90%, and place it on the left side, angled on the sign. Next, find and open the el 41, and reduce it by 80%, and place it on the bottom right, behind the rocks. Next, find and open the el 4, and reduce it by 90%, and place it on the bottom left, in front of the rocks. Next, find and open the el 72, and reduce it by 35%, and place it on the top right, behind the pot of gold.
Next, find and open the el 49, and reduce it by 80%, and place it centered, behind all the layers. Next, find and open the el 65, and reduce it by 70%, and place it on the bottom right, behind the rock...duplicate and flip it horizontally and place on the left. Next, find and open the el 27, and reduce it by 90%, and place it on the bottom right, beside the rocks. Next, find and open the el 71, and reduce it by 90%, and place it on the bottom right, in front of the other rocks.
Next, find and open the el 44, and reduce it by 90%, and place it on the bottom right, by the rocks. Next, find and open the el 8 and reduce it by 95%, and place it on the bottom right, in the rocks. Next, find and open the el 33, and reduce it by 90%, and place it on the top left, angled, by the sign. Next, find and open the el 40, and reduce it by 80%, and place it on the bottom right, to the left of the pot. Next, find and open the el 3 and reduce it by 95%, and place it on the bottom right, in front of the rocks.
Next, find and open the el 23, and reduce it by 95%, and place it on the top left, on the sign post. Next, find and open the el 36, and reduce it by 90%, and place it on the bottom right, on the left side of the pot. Next, find and open the el 66, and reduce it by 95%, and place it on the bottom right...duplicate it and flip it horizontally and place on the bottom left. Next, find and open the el 24, and reduce it by 95%, and place it on the bottom right, on the rocks.
Next, find and open the el 52, and reduce it by 90%, and place it on the bottom right, to the left of the pot. Next, find and open the el 67, and reduce it by 95%, and place it on the bottom right, behind the gold on the rocks. Next, find and open the el 47, and reduce it by 95%, and place it on the bottom left, behind the rocks, angled.
Lastly, add 3D drop shadows wherever you would like them to be....I like these settings: 2V 1H 70 op, 4B. Make sure at this point that you add the copyright information (VERY IMPORTANT)!!
You did it! You now have finished this tag. Finally, add a name in any font and color of your choosing. I hope you enjoyed this tutorial. If you did, please follow my blog and pass it along to others. If you make a tag using this tutorial, please send it to me at robynebutts@gmail.com, so I can place it on my blog.
Hugs and blessings,
Robyne
Saturday, February 15, 2014

Preview of the Madam Heart tube

Preview of the Affairs of the Heart scrap kit

CT PTU tutorial for the Affairs of the Heart scrap kit by Felice Originals, featuring the Madam Heart tube by Felice Originals
Materials Needed
The Affairs of the Heart scrap kit by Felice Originals, which can be purchased at Sweet Pinups HERE
The Madam Heart tube by Felice Originals, which can be purchased at Sweet Pinups HERE
Template - #171 by Elegant Inspirations, which can be downloaded on the blog HERE
Mask by the Creative Chicks, which can be downloaded from their blog HERE
PSP - I am using X5, but any should do
***This tutorial assumes you have a working knowledge of PSP***
Okay, let's begin. The first thing you want to do is open the template from Elegant Inspirations. Then, let's create our mask. Open whatever mask you choose to use; I have chosen a mask by The Creative Chicks. Okay, in Paint Shop Pro (PSP) click FILE>OPEN>and open the mask you have chosen, then start a new image FILE>NEW>700x700 and transparent needs to be checked. Choose color or gradient on the right side layers menu; I chose a burgundy shade....flood fill the new blank image with the color or gradient..the flood fill is the paint bucket shape. Now go to the top layers menu and click NEW MASK LAYER> from image...a pop up opens..click on the title of the mask you chose in the drop down menu. Now go back to the side layers menu and click on the square that has the layers combined...right click it then click merge..the merge group..and voila..you have a mask layer now! :) Just copy and paste it to the tag, increasing the size and moving it around until you are happy with its position.
***(NOTE: there is a layers menu on the right side of your screen..if u do not see it then look up top and click VIEW>PALETTES>LAYERS and it will open up...u use this layer to bring things to the front..say for example u put a shoe on the tag but it went behind a bucket and u want it in front of the bucket...while holding the left click button on your mouse or touch pad down, you would slide the shoe to the layer the bucket is on..it would now be in the front...use this anytime u want to bring something to the forefront.)***
The next thing we want to do is to start adding our elements to make this tag come to life!! First, we need to put our papers on our template. The papers should be as follows: paper 3 on all black shapes except for the small black circles, paper 12 on all the dark pink shapes, paper 14 on the grey rectangle, paper 2 on the white shapes, paper 11 on the grey shapes, and paper 18 on the grey dotted boxes.
Next, find and open the Madam heart tube, and copy and paste her to the tag; reduce her size by 40% and center her on the tag, but a bit to the right. Now back to the original and copy and paste on the tag again...place it in the top left pink circle...arrange as u like it and then invert it...add a screen effect to it. Now go back and copy and paste the original again....this time place it in the bottom right peach circle...again decrease size and arrange to your liking...invert it and add a light peach film and filter effect.
Next, find and open the heart boxes and reduce it by 60%, and place it in the bottom left corner. Next, find and open the kitten and reduce it by 85%, and place it at the bottom, to the right of the tube. Next, find and open the pink champagne and reduce it by 85%, and place it on the bottom right, to the right of the cat. Next, find and open the queen of hearts card and reduce it by 90%, and place it on the bottom left, to the right of the boxes.
Next, find and open the perfume bottle and reduce it by 85%, and place it on the bottom left, to the right of the card. Next, find and open the film rose and reduce it by 90%, and place it on the bottom left. Next, find and open the hand bag and reduce it by 80%, and place it on the bottom right, behind the champagne. Next, find and open the key and reduce it by 45%, and place it on the bottom left, to the right of the perfume...at an angle. Next, find and open the diary and reduce it by 80%, and place it on the bottom left, behind the key.
Next, find and open the el xoxo sign and reduce it by 85%, and place it on the top right side. Next, find and open the damask salmon bow and reduce it by 90%, and place it on the left side above the boxes. el heart teddy and reduce it by 65% and place it on Next, find and open the satin orange rose and reduce it by 90%, and place it on the bottom left, behind the key. Next, find and open the heart charm 3 and reduce it by 85%, and place it on the top left.
Next, find and open the bow orange and reduce it by 85% and place it on the top left, at the top of the hanging charm. Next, find and open the seal 2 and reduce it by 90%, and center it on the bow at the top left. Next, find and open the love letters and reduce it by 85%, and place it on the bottom right, angled behind the cat. Next, find and open the shoes and reduce them by 85%, and place them on the bottom right, behind the hand bag.
next, find and open the rose card 1 and reduce it by 90%, and place it on the bottom right, behind the champagne. next, find and open the love heart and reduce it by 90%, and place it angled at the top left. next, find and open the lips 2 and reduce it by 90%, and place it angled on the top right. Next, find and open the balloons 2 and reduce it by 85%, and place it angled on the top right.
Lastly, add 3D drop shadows wherever you would like them to be....I like these settings: 2V 1H 70 op, 4B. Make sure at this point that you add the copyright information (VERY IMPORTANT)!!
You did it! You now have finished this tag. Finally, add a name in any font and color of your choosing. I hope you enjoyed this tutorial. If you did, please follow my blog and pass it along to others. If you make a tag using this tutorial, please send it to me at robynebutts@gmail.com, so I can place it on my blog.
Hugs and blessings,
Robyne
Monday, January 20, 2014

Preview of the My Valentine scrap kit by Felice Originals!

CT PTU tutorial for the My Valentine scrap kit by Felice Originals, featuring the Nina tube by Alexander McMillan
Materials Needed
The My Valentine scrap kit by Felice Originals, which can be purchased at Sweet Pinups HERE
The Nina tube by Alexander McMillan, which I purchased at Scraps in the City..of course SATC is no longer open, so I am not sure if you can find theis tube anywhere else.
Template - #153 by Elegant Inspirations, which can be downloaded on the blog HERE
Mask # 81 by Wee Scot Lass Creations, which can be downloaded HERE
PSP - I am using X5, but any should do
***This tutorial assumes you have a working knowledge of PSP***
Okay, let's begin. The first thing you want to do is open the template from Elegant Inspirations. Then, let's create our mask. Open whatever mask you choose to use; I have chosen mask #81 by Wee Scot Lass Creations. Okay, in Paint Shop Pro (PSP) click FILE>OPEN>and open the mask you have chosen, then start a new image FILE>NEW>700x700 and transparent needs to be checked. Choose color or gradient on the right side layers menu; I chose a black and white gradient....flood fill the new blank image with the color or gradient..the flood fill is the paint bucket shape. Now go to the top layers menu and click NEW MASK LAYER> from image...a pop up opens..click on the title of the mask you chose in the drop down menu. Now go back to the side layers menu and click on the square that has the layers combined...right click it then click merge..the merge group..and voila..you have a mask layer now! :) Just copy and paste it to the tag, increasing the size and moving it around until you are happy with its position.
***(NOTE: there is a layers menu on the right side of your screen..if u do not see it then look up top and click VIEW>PALETTES>LAYERS and it will open up...u use this layer to bring things to the front..say for example u put a shoe on the tag but it went behind a bucket and u want it in front of the bucket...while holding the left click button on your mouse or touch pad down, you would slide the shoe to the layer the bucket is on..it would now be in the front...use this anytime u want to bring something to the forefront.)***
The next thing we want to do is to start adding our elements to make this tag come to life!! First, we need to put our papers on our template. The papers should be as follows: paper 34 on the black circles 2 and the black rectangles, paper 6 on the pink squares and pink circles, paper 5 on the grey squares, and paper 8 on the lt pink circle 1 and circles 2.
Next, find and open the Nina tube, and copy and paste her to the tag; reduce her size by 20% and center at the bottom of the tag. o back to the original and erase from the chest down..copy and paste it to the tag and reduce it by 40%, place it on the left side on the layer behind the gold circle layer...duplicate it and flip it horizontally and place it on the right side. Erase and extras, and then add a brick texture to both close ups.
Next, find and open the el heart splatter and increase the size by 15% and center it on top of the mask layer. Next, find and open the el blanky 2 and reduce it by 35% and place it on the right side bottom, making sure it is on the layer behind the closeup. Next, find and open the el champagne flutes and reduce it by 45% and place them in the bottom right corner, on top of the blanky. Next, find and open the el kitten and reduce it by 30%, and place it on the bottom right on the blanky.
Next, find and open the el bow 2 and reduce it by 85% and place it on the top right, angled. Next, find and open the el heart jewel (cream one) and reduce it by 90%, and center it angled on the bow. Next, find and open the el wine bottle and reduce it by 25%, and place it in the bottom left corner. Next, find and open el candy box 2 and reduce it by 35% and place it on the bottom left, to the right of the wine bottle.
Next, find and open the el heart locket necklace and reduce it by 40% and place it on the bottom right, turn it where the heart is at the bottom. Next, find and open the el heart teddy and reduce it by 65% and place it on the bottom left, underneath the candy box. Next, find and open the el valentine's balloons and reduce it by 65%, and place it angled in the top left corner.
Next, find and open the el lingerie set 2 and reduce it by 80% and place it angled, in the bottom right corner, on top of the blanky. Next, find and open the el word art 1 and reduce it by 85% and place in the bottom center, on top of the tube. Next, find and open the el rose red and reduce it by 90%, and place it on the bottom left, angled beside the candy. Lastly, find and open the el paper butterfly 2 and reduce it by 90%; place it top center.
Lastly, add 3D drop shadows wherever you would like them to be....I like these settings: 2V 1H 70 op, 4B. Make sure at this point that you add the copyright information (VERY IMPORTANT)!!
You did it! You now have finished this tag. Finally, add a name in any font and color of your choosing. I hope you enjoyed this tutorial. If you did, please follow my blog and pass it along to others. If you make a tag using this tutorial, please send it to me at robynebutts@gmail.com, so I can place it on my blog.
Hugs and blessings,
Robyne
Monday, November 25, 2013
 unk
Preview of the Punk Rocks scrap kit by Felice Originals!

Tutorial using the Punks Rocks scrap kit by Felice Originals, including posers by Felice Originals!
Supplies Needed
Paint Shop Pro - I am using X5, but any should do!
The Punk Rocks scrap kit by Felice Originals, which includes the posers by Felice Originals, and can be purchased at Exquisite Scraps HERE
Any mask of your choosing
A template by Tamie at CreativeChicks.blogspot.uk
Any color or gradient and font of your choosing
Okay, let's begin. The first thing you want to do is open the template by Creative Chicks. Then, let's create our mask. Open whatever mask you choose to use; I have chosen a mask made by Souldesigner. Okay, in Paint Shop Pro (PSP) click FILE>OPEN>and open the mask you have chosen, then start a new image FILE>NEW>700x700 and transparent needs to be checked. Choose color or gradient on the right side layers menu; I chose a black and white gradient....flood fill the new blank image with the color or gradient..the flood fill is the paint bucket shape. Now go to the top layers menu and click NEW MASK LAYER> from image...a pop up opens..click on the title of the mask you chose in the drop down menu. Now go back to the side layers menu and click on the square that has the layers combined...right click it then click merge..the merge group..and voila..you have a mask layer now! :) Just copy and paste it to the tag, increasing the size and moving it around until you are happy with its position.
***(NOTE: there is a layers menu on the right side of your screen..if u do not see it then look up top and click VIEW>PALETTES>LAYERS and it will open up...u use this layer to bring things to the front..say for example u put a shoe on the tag but it went behind a bucket and u want it in front of the bucket...while holding the left click button on your mouse or touch pad down, you would slide the shoe to the layer the bucket is on..it would now be in the front...use this anytime u want to bring something to the forefront.)***
The next thing we want to do is to start adding our elements to make this tag come to life!! First, we need to put our papers on our template. The papers should be as follows: paper black jeans on rasters 1, 3, and c3, paper pink dots on rasters 12 and c12, paper stripe on rasters 7, c7, c 2 of 7, 3 2 of 7, and paper diamond plaid on rasters 11 and c11.
Next, find and open the punk girl 1 poser...copy and paste her onto the tag on the left rectangle; reduce her by 15% and place her on there neatly...and then duplicate it, flip it horizontally and place on the right side rectangle. Next, find and open the punk girl 2 poser and copy and paste her to the tag on the center rectangle; reduce her by 15%. Make the papers behind the two side posers a grid texture.
Next, find and open the chicken wire and place it on top of the center rectangle behind the poser; reduce the size to fit. Next, find and open the punk jeans and reduce them by 75% and place them angled on the bottom right-hand corner. Next, find and open the punk boots and reduce them by 70% and place them in the bottom left-hand corner. Next, find and open the punk shirt 1 and reduce it by 85% and place it on the bottom right corner. Next, find and open the punk belt and reduce it by 65% and place it angled on the top right corner. Next, find and open the safety pin and reduce it by 85% and place it angled on the top left corner.
Next, find and open the skirt and reduce it by 90% and place it on the bottom left, to the right of the boots. Next, find and open the notebook 2 and reduce it by 90% and place on the bottom to the right of the skirt. Next, find and open the phone and reduce it by 97% and place it on the bottom right, to the left of the jeans. Next find and open the camouflage pen and reduce it by 98% and place angled on top of the notebook 2.
Next, find and open the guitar and reduce it by 75% and place it angled behind the center poser. Next, find and open the cute skull and reduce it by 90% and place it top center above the guitar. Next, find and open the leather jacket and reduce it by 90% and place it on the bottom right to the left of the phone. Next, find and open the flair button 2 and reduce it by 95% and place it on the left side above the skirt. Next, find and open the flair button 1 and reduce it by 95% and place it on the right side above the jacket.
Lastly, add 3D drop shadows wherever you would like them to be. Make sure at this point that you add the copyright information (VERY IMPORTANT)!!
You did it! You now have finished this tag. Finally, add a name in any font and color of your choosing. I hope you enjoyed this tutorial. If you did, please follow my blog and pass it along to others. If you make a tag using this tutorial, please send it to me at robynebutts@gmail.com, so I can place it on my blog.
Hugs and blessings,
Robyne
Thursday, November 14, 2013

Preview of the Burlesque Xmas scrap kit by Felice Originals!

Preview of the matching Burlesque Santa tube by Felice Originals!
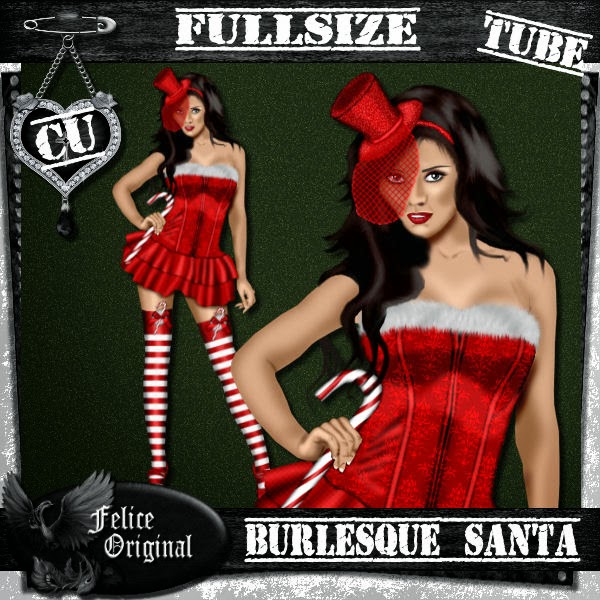
Tutorial using the Burlesque Santa tube, and the matching Burlesque Xmas scrap kit by Felice Originals!
Supplies Needed
Paint Shop Pro - I am using X5, but any should do!
The Burlesque Santa tube by Felice Originals. which can be purchased at Exquisite Scraps HERE
The Burlesque Xmas scrap kit by Felice Originals, which can also be purchased at Exquisite Scraps HERE
Mask #84 from Wee Scott Lass
Template #67 from Millie's PSP Madness
Any color or gradient and font of your choosing
Okay, let's begin. The first thing you will need to do, is to open the Template #67 by Millie's PSP Madness. Next, let's create our mask. I have chosen a mask #84 from Wee Scott Lass. Okay, in Paint Shop Pro (PSP) click FILE>OPEN>and open the 1st mask you have chosen, then start a new image FILE>NEW>600x600 and transparent needs to be checked. Choose color or gradient on the right side layers menu; I chose a metallic gold dual toned gradient...flood fill the new blank image with the color or gradient..the flood fill is the paint bucket shape. Now go to the top layers menu and click NEW MASK LAYER> from image...a pop up opens..click on the title of the mask you chose in the drop down menu. Now go back to the side layers menu and click on the square that has the layers combined...right click it then click merge..the merge group..and voila..you have a mask layer now! :) Just copy and paste it to the tag, and increase the size by 10%...move it around until you are happy with the amount that shows.
***(NOTE: there is a layers menu on the right side of your screen..if u do not see it then look up top and click VIEW>PALETTES>LAYERS and it will open up...u use this layer to bring things to the front..say for example u put a shoe on the tag but it went behind a bucket and u want it in front of the bucket...while holding the left click button on your mouse or touch pad down, you would slide the shoe to the layer the bucket is on..it would now be in the front...use this anytime u want to bring something to the forefront.)***
Now, let's add some other items to start adding depth and dimension to our tag! The first thing we want to do, is place papers on parts of our template. The following is where your papers should be: paper 5 on raster 1, paper 8 on raster 2, paper 9 on rasters 5 and 6, paper 6 on rasters 7 and 8.
The next thing we want to do is to start adding our elements to make this tag come to life!! The very first thing we will want to do is to add our Burlesque Santa tube. Open her in the red outfit, and copy and paste her full-view to the tag, making sure she is in the forefront. Reduce her size by 10% and center her on the tag. Now, open the close up view in the green and erase all from the neck down..place on left circle and decrease size to fit...duplicate it and flip it horizontally and place on the right circle. Use the effects menu and give the circle pics as well as the circles they are on the fine canvas texture.
Next, find and open the lace snowflake and reduce it by 20% and center it behind all the tube layers. Next, find and open the white tree and reduce it by 50% and place it on the right side, behind the close up tube. Next, find and open the gold bow and reduce it by 90% and place at the top of the tree; duplicate it and flip it horizontally to make a fuller bow. Next, find and open the bells and reduce the size by 90% and place them hanging from the center of the gold bow on the tree.
Next, find and open the red and green balls and reduce them by 98%; place 2 of each on the tree where you like them. Next, find and open the fire place and reduce it by 65% and place it on the bottom left of the tag, in the forefront. Next, find and open the purse and lipstick and reduce it by 80% and place it on the left bottom of the fireplace, in the forefront. Next, find and open the feather fan and reduce it by 90% and place it angled in the full-view tube's hand.
Next, find and open the champagne flute and reduce it by 80% and place it in the bottom right corner. Next, find and open the red frosted berries and reduce them by 90% and place them behind and above the flute. Next, find and open the gold holly and reduce it by 95% and place where the flute top and frosted berries meet., in the forefront. Next, find and open the red gift box and reduce it by 90% and place it on the bottom right of the fireplace, in the forefront. Next, find and open the potpourri and reduce it by 90% and place on the top left of the fireplace; duplicate and flip it horizontally and place on the top right of the fireplace.
Next, open the present boxes and reduce by 80% and place in the right bottom corner, to the left of the champagne flute. Next, find and open the poinsettia 2 and reduce it by 90% and place it on the right side, and place it on the top left of the presents. Next, open the red bow and reduce it by 90% and place on the top left corner; duplicate it and flip it horizontally to make it fuller. Next, find and open the gold star and reduce it by 90% and center it on the red bow in the top left corner. Lastly, find and open the puppy and reduce it by 80% and place it at the bottom, between the tube's legs.
Lastly, add 3D drop shadows wherever you would like them to be. Make sure at this point that you add the copyright information (VERY IMPORTANT)!!
You did it! You now have finished this tag. Finally, add a name in any font and color of your choosing. I hope you enjoyed this tutorial. If you did, please follow my blog and pass it along to others. If you make a tag using this tutorial, please send it to meat robynebutts@gmail.com, so I can place it on my blog.
Hugs and blessings,
Robyne
Sunday, November 10, 2013

Preview of the Leopard & Roses scrap kit by Felice Originals!

Tutorial using the Leopard & Roses scrap kit by Felice Originals!
Supplies Needed
Paint Shop Pro - I am using X5, but any should do!
The Leopard & Roses scrap kit by Felice Originals, which can be purchased at Exquisite Scraps HERE
Mask #84 from Wee Scott Lass
Template #180 from Addictive Templates
Any color or gradient and font of your choosing
Okay, let's begin. The first thing you will need to do, is to open the Template # 180 by Addictive Templates. Next, let's create our mask. I have chosen a mask #84 from Wee Scott Lass. Okay, in Paint Shop Pro (PSP) click FILE>OPEN>and open the 1st mask you have chosen, then start a new image FILE>NEW>600x600 and transparent needs to be checked. Choose color or gradient on the right side layers menu; I made a 2 layer mask..for the first layer I did a black and white dual toned gradient and a pink dual toned gradient for the second and top layer....flood fill the new blank image with the color or gradient..the flood fill is the paint bucket shape. Now go to the top layers menu and click NEW MASK LAYER> from image...a pop up opens..click on the title of the mask you chose in the drop down menu. Now go back to the side layers menu and click on the square that has the layers combined...right click it then click merge..the merge group..and voila..you have a mask layer now! :) Just copy and paste it to the tag, and increase the size by 10%...move it around until you are happy with the amount that shows. Repeat the process with the pink layer mask.
***(NOTE: there is a layers menu on the right side of your screen..if u do not see it then look up top and click VIEW>PALETTES>LAYERS and it will open up...u use this layer to bring things to the front..say for example u put a shoe on the tag but it went behind a bucket and u want it in front of the bucket...while holding the left click button on your mouse or touch pad down, you would slide the shoe to the layer the bucket is on..it would now be in the front...use this anytime u want to bring something to the forefront.)***
Now, let's add some other items to start adding depth and dimension to our tag! The first thing we want to do, is place papers on parts of our template. The following is where your papers should be: paper 9 on rasters 5, c5, 6, and 10, paper 12 on rasters 7 and 9, paper 6 on rasters 2 and c2, paper 7 on raster 3, paper 11 on raster 8 and c8, and paper 4 on rasters 4 and c4.
The next thing we want to do is to start adding our elements to make this tag come to life!! The very first thing we will want to do is to add our poser tube. First find and open the full view of the poser; reduce her by 10% and center her on the tag. Now open the close up of the tube and copy and paste it to the right circle on the right bottom of the tag; decrease size to fit and erase/cut the extra.
Next, find and open the puppy bag and reduce it by 60% and place it in the bottom left corner. Next, find and open the handbag and reduce it by 80% and place it at the bottom ,on the right side of the poser. Next, find and open the beauty case and reduce it by 70% and place on the bottom left, to the right of the puppy bag. Next, find and open the car and reduce it by 50% and place it towards the left side, on the layer behind the tubes.
Next, find and open the mannequin and reduce it by 80% and place on the bottom right corner. Next, find and open the laptop and reduce it by 90% and place it on the bottom right, to the left of the mannequin. Next, find and open the cap and reduce it by 95% and place it hanging on the left top corner of the laptop. Next, find and open the fan and reduce it by 90% and place at the top right angled...duplicate it and flip it horizontally and place top left.
Next, find and open the flair button and reduce it by 90% and place in the top left corner and top right corner. Next, find and open the lips and reduce by 90% and place on top of the right side fan. Next, find and open the notebook and reduce it by 95% and place it angled on the right side, above the close up tube. Next, find and open the boots and reduce by 95% and place in the right bottom corner. Next, find and open the flower branch and reduce it by 15% and place it on the left side behind the car layer; duplicate and flip it horizontally and place on the right side. Lastly, find and open the notebook leopard and reduce it by 90% and place it angled on the top left.
Lastly, add 3D drop shadows wherever you would like them to be. Make sure at this point that you add the copyright information (VERY IMPORTANT)!!
You did it! You now have finished this tag. Finally, add a name in any font and color of your choosing. I hope you enjoyed this tutorial. If you did, please follow my blog and pass it along to others. If you make a tag using this tutorial, please send it to meat robynebutts@gmail.com, so I can place it on my blog.
Hugs and blessings,
Robyne
Subscribe to:
Posts
(Atom)
Licensed Reseller

Beautiful Blog Award

Designer That Inspires Award

Blog I Love Award

Rawk My Socks Award

CU License Tagging Obsessions
Niqui Designs CU License

CU License Scraps Dimensions

DzinesByMelz CU License

Anorie's CU License

CU License Lacarolita's Designz
CU License Tezza'a Dezignz

CU License Scrap and Tubes

Cakie Pot Pie CU License

Denise Creationz CU License
EW CU License

FDM CU License

More shops I CT for & Love


 "


